Use the SDK to upload and manage files
Accept images, spreadsheets, documents, or any other binary file in a custom Blackbaud CRM add or edit form.
Blackbaud CRM supports uploading binary files through custom forms built with the Infinity SDK. Whether it’s an image, Excel sheet, Word document, or any other binary contents, you can accept it in your customization. File uploads are one of those features that isn’t really hard to implement, but it’s not well documented. Looking at Blackbaud-authored specs is one option, but often the file upload logic is mixed up with dozens of other features that make it hard to decipher what’s really going on.
In this article, we’ll walk through what it takes to support file uploads in a custom add form, and then what changes when you need to edit a file that has already been uploaded.
Part 1: Upload a file within an Add form
Table spec
The first thing you’ll need to know is that the SDK is going to want to associate your file with a file name. That comes into play right away as we modify our table spec.
You’d probably expect to need a binary field for the data itself, but it’s not as obvious that you’ll need a file name field.
Here is an example pair of fields for your table spec:
<BinaryField Name="TESTIMAGE" Required="true" Description="Image file for users to see"/>
<TextField Name="TESTIMAGEFILENAME" Length="500" Required="true" Description="File name of the image"/>
Add form
Add the two fields to your add form, and link them together with the little-known <File> element:
<FormField FieldID="TESTIMAGE" Caption="Test image" DataType="Binary">
  <File FileNameFieldID="TESTIMAGEFILENAME"/>
</FormField>
<FormField FieldID="TESTIMAGEFILENAME" Caption="Test image file" Required="true" MaxLength="500" Multiline="false" DataType="String"/>
The SQL parameters associated with the file field will need to be of type varbinary(max) like so:
,@TESTIMAGE         varbinary(max) = null
,@TESTIMAGEFILENAME nvarchar(500)  = ''
Make sure to load your spec before moving on to the next step.
UIModel
Create a UIModel for your add form (or, if you already have one, use Tools > Refresh UIModel to update it).
You won’t need to touch the .NET code file. But you will need to make the following changes to the HTML file:
1) Add the following CSS block to the very top, above everything else:
<style type="text/css">
  .filename-input {
    background: transparent !important;
    border: none !important;
    outline: none !important;
    padding: 0px 0px 0px 0px !important;
  }
</style>
2) Change the file name field as shown in these before-and-after snippets.
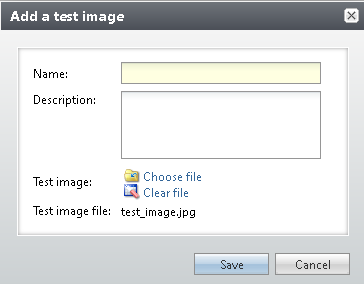
<textarea id="#MAP#TESTIMAGEFILENAME_value" rows="3" cols="1"></textarea><input id="#MAP#TESTIMAGEFILENAME_value" type="text" class="filename-input"/>3) Finally, load your spec, deploy the HTML and DLL, and you should have a good looking file upload field:
Part 2: Handle files within an Edit form
Adding file support to an add form is relatively easy. Adding support to an edit form is just slightly more involved.
Edit form fields
There are two significant differences in our field definitions on an edit form compared to the add form.
We do still need the binary image, and we still need the file name. But keep in mind that with an edit form, binary data may already exist. To handle that, you will also need a field that indicates when the file has changed.
Furthermore, we are going to have to tell CRM how to retrieve the image file from the database, using a custom SQL function. Note that the function is required, even if you don’t plan to actually download the file from within your form.
Here is an example trio of fields for your edit form:
<FormField FieldID="TESTIMAGE" Caption="Test image" DataType="Binary">
  <File FileNameFieldID="TESTIMAGEFILENAME" FileChangedFieldID="TESTIMAGEFILECHANGED">
    <FNFileDownload FNName="USR_NPC_UFN_DOWNLOAD_TEST_IMAGEFILE">
      <CreateFunctionSQL>
        <![CDATA[
        CREATE FUNCTION USR_NPC_UFN_DOWNLOAD_TEST_IMAGEFILE(@ID UNIQUEIDENTIFIER)
        RETURNS TABLE
        AS
        RETURN (SELECT TESTIMAGE FROM USR_NPC_TEST WHERE ID = @ID)
        ]]>
      </CreateFunctionSQL>
    </FNFileDownload>
  </File>
</FormField>
<FormField FieldID="TESTIMAGEFILENAME" Caption="Test image file" Required="true" MaxLength="500" Multiline="false" DataType="String"/>
<FormField FieldID="TESTIMAGEFILECHANGED" Caption="File changed" DataType="Boolean" Hidden="true"/>
Make sure to load your spec before moving on to the next step.
UIModel HTML
Create a UIModel for your edit form (or, if you already have one, use Tools > Refresh UIModel to update it).
Make the following changes to the HTML file:
1) Add the following CSS block to the very top, above everything else:
<style type="text/css">
  .filename-input {
    background: transparent !important;
    border: none !important;
    outline: none !important;
    padding: 0px 0px 0px 0px !important;
  }
</style>
2) Change the file name field as shown in these before-and-after snippets.
<textarea id="#MAP#TESTIMAGEFILENAME_value" rows="3" cols="1"></textarea><input id="#MAP#TESTIMAGEFILENAME_value" type="text" class="filename-input"/>UIModel .NET
Open the .VB or .CS file for your UIModel.
Add a handler for the image FileSelected event. The below example is in VB.
Private Sub _testimage_FileSelected(sender As Object, e As FileSelectedEventArgs) Handles _testimage.FileSelected
  TESTIMAGEFILECHANGED.Value = True
End Sub
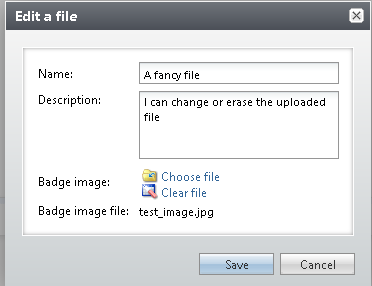
Finally, load your spec, deploy the HTML and DLL, and you should have a fully functional file upload field in your edit form.
Questions? Comments? Please reach out at contact@nonprofit-complete.com, or via any of the methods on our Contact page.